Abstract: College students struggle with synthesis assignments, often producing serial summaries of texts (for example, Aitchison & Lee, 2006; Bloom, 1956). Graphic organizers visualize the connections between information in multiple texts (for example, Daher & Kiewra, 2016; Hall & Strangman, 2008). This essay introduces the Mapping the Conversation exercise as such a graphic organizer and discusses its set-up and execution. The exercise challenges students’ critical thinking and actively engages them in the writing process, ultimately aiding students in producing complex and concise syntheses. The exercise was originally developed for a first-year writing course but can be adapted for advanced writers and courses across all majors.
In my early years teaching writing, I encountered a situation where all instructors were expected to teach a synthesis assignment in their first-year writing classes. Yet, no matter how hard I tried, how many examples my students and I dissected, how many exercises we completed, how many peer review sessions or conferences I offered, most students kept failing at producing successful syntheses. I realized that to resolve the situation I had to develop what was, for me, a new kind of exercise. Ultimately, I designed a graphic organizer exercise, which I named Mapping the Conversation. This mapping exercise, by using sticky notes and colorful markers, creates a visual and tactile engagement with texts, moving students from a linear reading of texts to a complex synthesis of ideas and topics represented within those texts. In this essay, I discuss the exercise’s preparation, its four main steps (note taking, clustering, drawing connections, discussion), its adjustments to teaching in virtual/hybrid or settings other than first-year writing, as well as the exercise’s challenges and successes.
A successful synthesis identifies the complex network of themes, core ideas, and main concepts within and across texts. Students, then, showcase the connections in a concisely written paper. Because writing is an integral part of knowledge production (Aitchison and Lee 2006), synthesis is an extraordinarily challenging task for students at any level of education (Bloom 1956). I often find that synthesis is further complicated when students work with different textual genres, print and electronic, as they now not only deal with comprehending content, but also different rhetorical affordances, such as ethos, pathos, logos, and medium. Students also often struggle with different synthesis tasks within the same course, but also between different courses. For example, asking students to provide an original argument should result in a different synthesis than asking them to present information or to conduct a comparison.
Throughout the research and writing process, students must resolve a number of problems. The main issue students must resolve is that of joining the ongoing scholarly discussion surrounding their topic. Kenneth Burke’s ((1941)) parlor metaphor comes to mind; he describes a participant who attempts to join an ongoing discussion without ever being able to retrace all aspects of it.1 In other words, when we are asking our students to synthesize, we are asking them to immerse themselves in an ongoing (scholarly) discussion with which they are largely unfamiliar and then to portray that discussion in writing. As a teacher of a variety of writing courses, such as first-year academic as well as upper-level professional writing, I am no stranger to students’ difficulties with synthesis assignments. When I work with my students on synthesis, I expect them to move from a linear reading of texts to an interconnected, iterative, and highly complex understanding of that content before translating their newly gained knowledge into a synthesis that retains and displays the highly complex network of idea. Not surprisingly, many students struggle throughout this process of translating information.
For example, already during the reading and note-taking stage, students should move from the linear reading of texts to connecting information in their notes. This process causes difficulty for many students (Du and List 2020); it sets them up to create serial, also referred to as parallel or linear, summaries of the texts (Daher and Kiewra 2016) rather than the desired synthesis. The reasons why students default to serialization are varied, including cognitive challenges (Blondy et al. 2016) and established writing habits, such as students’ past experiences with annotated bibliographies that ask for, and therefore reinforce, the serial presentation of texts. Moreover, proven strategies for teaching synthesis remain rare (Blondy et al. 2016), and students often note a general lack of clarity in instructors’ communications of expectations and desired outcomes (Lillis and Turner 2001). After a number of years teaching first-year writing and adjusting my teaching and feedback, I still kept encountering those same challenges detailed by many researchers of writing studies. I kept asking myself, how could I move students away from serial summaries and toward synthesis?
Writing Studies research shows that students who spend more time in the pre-writing stage produce more complex and concise drafts (Escorcia et al. 2017) and that students who invest in writing as an active procedure, “de-constructing and re-constructing, dis-connecting and re-connecting, as well as shaping and re-shaping” (Badley 2009, 209) their work, are more likely to produce complex syntheses. Based on this knowledge, I set out to develop an exercise that would encourage my students to invest in their pre-writing and writing. My scholarly interest in embodied knowledge led me to design an exercise that would move students toward experiencing and interacting with texts in a more tactile, physical manner, resulting in what I have come to call the “Mapping the Conversation” exercise. I now understand that such mapping is a form of graphic organizer; these are also known under many other names, such as concept maps, diagrams, matrices, knowledge networks, and advance organizers, and can take many different forms (for example, see Hall & Strangman, 2008). Graphic organizers are tools that can help students actively engage in the writing process during and after the pre-writing stage. Such organizers have been found to improve learning outcomes and are effective in helping students visualize how information connects (Daher and Kiewra 2016; Hall and Strangman 2008). Furthermore, graphic organizers are beneficial for students from all backgrounds, including those with disabilities (Deshler et al. 2001; Ellis and Howard 2007) and novice writers (Lee and Tan 2010). What all organizers have in common, however, is the use of graphic elements that visually depict connections and relationships between themes, ideas, concepts, and terms (Hall and Strangman 2008) in a non-linear fashion.
To teach students how to synthesize information, I use Mapping the Conversation as a low-stakes learning to write activity, which can be assessed as a pass/fail or nongraded assignment. Usually, I consider the assignment as part of students’ participation grade for the semester. I first developed and used this exercise in first-year writing courses, but it can be easily adapted to the needs of upper-level courses, including non-writing specific courses in the majors. I provide some further discussion on adaptations of this exercise for advanced writers and in digital formats at the end of the article. In first-year writing courses, students complete the mapping exercise twice, once in small groups with the same texts, and next individually with texts specific to their individual research project. In upper-level courses, the first run-through of the exercise can be shortened to a discussion of the exercise and the presentation of a few examples. Whatever the procedure, once carefully prepared and set-up, the Mapping the Conversation exercise can be divided into 4 steps: Note taking, Clustering, Drawing Connections, and Discussion.
Mirroring Burke’s ((1941)) parlor metaphor, my students imagine synthesis as a conversation. We begin on familiar territory: I ask students to picture a dinner conversation, maybe their family’s Thanksgiving dinner, and to think of the conversations that take place. Just this semester, one student provided a most vivid retelling of their family’s spirited discussion around the dinner table, with some members agreeing on a topic, others disagreeing, some loudly interjecting, others quietly making their point. The class not only had a good laugh, but also quickly agreed that a conversation is a back and forth of voices, never a sequence of monologues without response or interaction between speakers. While, or maybe because, this is a simple exercise, it is one that has never failed me, neither at a prestigious research university on the West coast nor a small religious institution in the Midwest; it has been successful with undergraduate and graduate students alike. First, most students have experiences with family dinners; if they have not participated in one, they likely have seen one portrayed on TV. But maybe more importantly, situating the class discussion in personal experiences rather than academic expectations takes away the pressure of “getting it right.” The energy in the classroom unmistakably lights up as many students share in the conversation.
From here, I shift our classroom discussion to the texts we study. I ask students to imagine the authors of their texts sitting around that dinner table, deeply in conversation. What would they say to each other? Who would agree with whom? Who would disagree with whom? Which author would be able to provide more in-depth information to something another author introduced? Do all authors speak to all topics? Do some remain silent? Is there an identifiable reason for the silence? Finally, do all authors speak with the same authority and ethos? This imaginary conversation is the synthesis towards which the students strive.
As we move into the mapping exercise, I provide my students with the following materials: a handout that explains the exercise (presented here as the assignment), sticky-notes of different colors, large pieces of paper (or, if available and practical, space on a whiteboard), and colored markers. Step 1, Note Taking, varies in time depending on the number and complexity of texts. Steps 2-4 take about 100 minutes. Depending on available class time and students’ familiarity with content and/or synthesis, Steps 2 and 3 can be (partially) assigned as out-of-class activities.
Note taking is a crucial component of the reading process, and students who take notes while reading were found to better understand intertextual relationships than those who did not (Kobayashi 2009). I provide students with a “Reading & Note Taking Worksheet” to encourage note taking (see Supplementary Materials). This handout can be shared as hardcopy or in electronic format, depending on the needs of the students and instructor. The handout asks them to identify the text’s author(s), title and genre. In addition, and more importantly, students also identify and note main ideas, concepts, terms, and keywords, and copy particularly noteworthy quotes. Finally, students are challenged to record any connections the text has with other sources they are familiar with, including, but not limited to, texts they study for my or other classes’ projects. As with many writing and reading strategies, some students take to these handouts and make extensive notes, others provide only a few comments. Similarly, some students adopt the technique as they move on to reading new texts; other students never use the handouts again. Despite the mixed engagement with the note taking handout, I find value in all students having at least some keywords and ideas identified as they move into the mapping exercise as these notes provide the backbone to their discussions with each other.
Once students have read their texts and completed the accompanying handouts, they are provided with the sticky notes onto which they transfer their notes. Using sticky notes during this step will help students during the next stages of the exercise. I also provide two main recommendations: First, use different colored sticky notes for each text (for example, Text 1—green, Text 2—yellow, Text 3—blue), and second, write only one concept/definition/term/etc. on each sticky note. The different colors function as a simple citation device, keeping track where each piece of information comes from. Limiting information on each sticky note to a keyword or a short phrase helps students move information around as they think and re-think connections. While it is intensive work, perhaps even tedious, to copy notes from the handout to the sticky notes, the step allows students to refresh their memory and knowledge of the text(s) they have read; it also invites discussion within student groups as they decide which information to copy onto the sticky notes and how to focus information from the note taking worksheet.
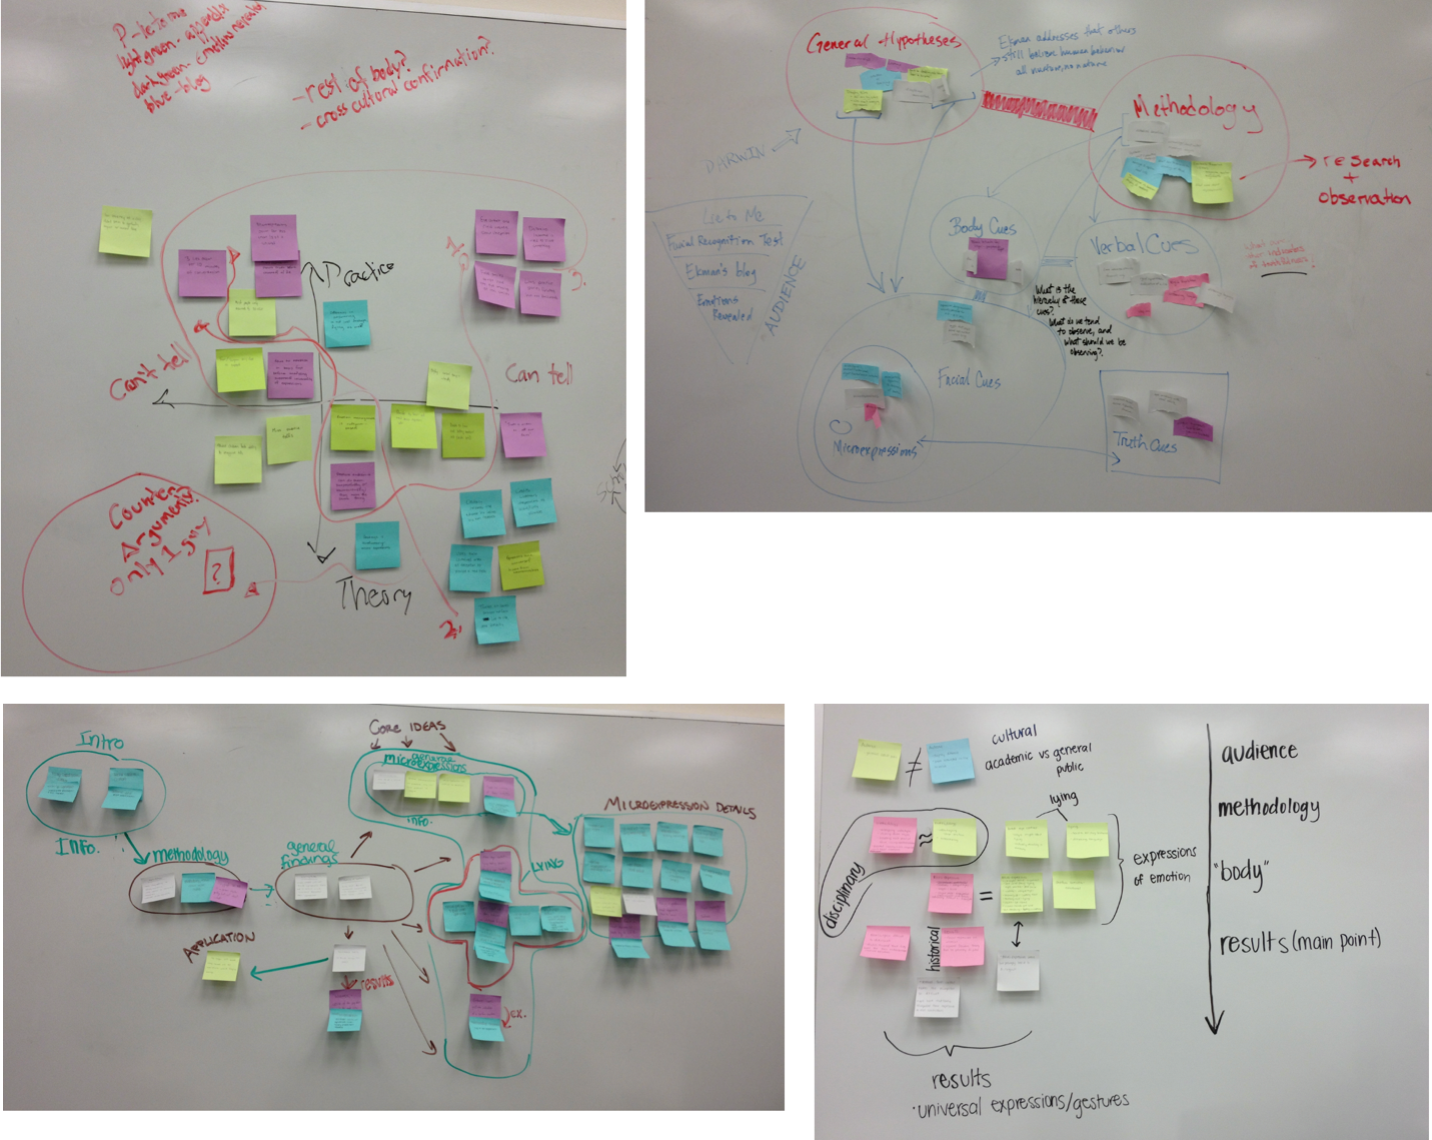
Step 2 asks students to cluster information and map connections. I provide them with a large blank canvas, either space on a whiteboard or a large piece of paper, upon which they can attach, and move around, their sticky notes. Students begin by organizing notes into stacks or clusters. Each cluster focuses on one particular topic, concept, etc., which they name and label. Then, they identify subtopics, sub-concepts, etc., within each cluster and further organize and re-organize their notes. This step can be difficult for many students because it challenges them to move away from a serial consideration of the texts and into synthesis. I have found that it helps to model a few examples and provide students with a starting point. Students also find it helpful to see examples of previously completed maps (see Figure 1); however, showing them maps that are based on the same texts on which they are working often leads to mimicry rather than true invention. While the groups work, I move around the classroom and provide feedback and encouragement that visually combining the texts, rather than keeping them separated on the page, is the correct idea.
As students begin identifying common themes and topics, I ask them to consider the relationships between those themes. For example, are they discovering any historical connections, a chronology of sorts? Are there disciplinary connections; can they find information on how different academic disciplines have studied and addressed the phenomenon? What cultural or social, regional or national, ethnic, racial, or gender relationships can they identify? As students begin identifying and labeling topics and themes, they also begin discovering the relationships within and among the texts they study.
At this point in the exercise, students seamlessly transition from clustering notes to moving them around on their canvas. Through the use of lines, arrows, and circles, they visualize the relationships between the previously identified clusters. Adding different colors, fonts, font sizes, forms, or even images creates a visual map of the network of ideas presented through the texts (see Figure 1). For example, students may visualize that one cluster is subordinate to another cluster or that one cluster constitutes a requirement/pre-requisite toward another cluster. The connections, now quite literally, emerge in front of their eyes.
Depending on how students conceptualize each cluster, it may become necessary to challenge them to not only map the connections between clusters, but also to draw connections between information within each cluster. For example, students may label a cluster as “Methodology” or “Body” and can express that the Body section builds on the Methodology section. Similarly, they may use topic descriptions, such as “facial expressions” or “lie detection,” and can visualize the former as a sub-topic to the latter. However, students often struggle to show connections within each cluster, that is, to show synthesis between texts on a more focused level. Pointing back at the Dinner Table Conversation metaphor and/or showing a few examples can help students label connections, such as “builds on each other,” “contributes,” “opposes,” etc. Students may also have to be encouraged to rethink and reorganize the placement of their notes. Completing this step of the mapping exercise assists students in recognizing the complex network of ideas and themes that connects their texts. Once students are satisfied with their map, I challenge them to think about in which order they would present the information in an essay, thereby leading them from a conceptual, visual map to written outline.
The fourth and final step of the mapping exercise, discussion, can take different forms. For example, when my first-year students work in groups on the same texts as other groups in the class, they will present their final map to their peers. Doing so supports student understanding that there is no one right way to connect information. They also learn that different maps emphasize (or deemphasize) certain connections and information. In contrast, when students work on their individual research projects, I meet with each student one-on-one to discuss their map. Such a meeting can take place during class time when I circle around the classroom or during one-on-one conferences to which students bring their maps (the actual physical or virtual map or a picture of their physical map) and any other notes or drafts they have worked on. Students narrate their map to me, thereby verbalizing how they interpret the network of ideas they visualized before we read together through their written synthesis and discuss it. Such a discussion, aided by the map, allows insight into the student’s conceptual process. For example, I have found that students may still fall back on producing written serial summaries, despite having produced a detailed map and being able to orally discuss the complex connections. Without the map, I might believe that the student failed to synthesize the information. Instead, students explain to me their belief that serial summaries are the only way to discuss texts as this is what was taught to them in the past, e.g., through annotated bibliographies. Once this misunderstanding is revealed, I encourage them to translate their visual map and oral discussion into a written synthesis. For example, I explain to the student that their oral narration of the map was a truly complex synthesis and that their writing can and should follow their own narration. However, if the student’s map or narration of the map was still partially serial, the map becomes a useful tool to model connections before asking the student to find other connections on their own. When students submit their completed synthesis for grading, I also require them to submit their map; this allows me to consider process and final product while grading.
Because most of my teaching takes place in traditional classrooms, I usually conduct the mapping exercise with analog tools, such as the previously discussed sticky notes and paper/whiteboards. However, the exercise can also be translated into a virtual classroom setting, using digital tools, whether for the use in online or hybrid classes or to accommodate students who missed class. The step-by-step process of the exercise, as conducted in a traditional classroom, can be followed in the same order for online or hybrid classes. However, if the exercise is being moved virtually for a student who was absent from class, it should be adjusted. For example, a student who misses the early stages of the exercise set-up and/or group meetings may be asked to develop an individual map and bring that map to a later class meeting; then they receive feedback from their group or the entire class. A wide variety of digital tools exists that can be used for this exercise. In what follows, I will focus on three digital tools with which I am familiar and have found easy to use in the online classroom. These three digital tools are Miro, Microsoft Office 365’s Whiteboard, and Jamboard by Google.
Miro (www.miro.com) is an online whiteboard tool that can be used for synchronous and asynchronous collaboration and is free of charge with an educational account. The software allows users to write and draw on the whiteboard background, upload images and other documents, and even offers a “sticky note” function. Each note’s color, shape, and size can be adjusted due to the user’s needs. Users can also type into the sticky notes. Lines, arrows, circles (pre-defined and free form) can be used to visually connect sticky notes, images, and text. Because Miro can be used synchronously and asynchronously, and users can switch back and forth between both modes, instructors can introduce the mapping exercise in class and have students complete it at home, either individually or in groups. Of the three digital tools discussed here, Miro offers users the most customization options, but for me, it was also the software with the steepest learning curve.
Microsoft Office 365’s Whiteboard is available to all Microsoft Office 365 users after logging into their Microsoft Office 365 account; its functionality is comparable to Miro’s. However, because Whiteboard is tied to individual users’ Office 365 accounts, access must be granted via a share link. Instructors using this software can choose setting up one or multiple spaces for their students and share access or ask students to set up their own space and share the respective link with the instructor and/or class. Of note, Microsoft provides a web version and an app of its whiteboard tool; the web version is more limited than the app. I have found differences between web and app versions can be confusing when teaching a software to users and troubleshooting issues they are experiencing.
Finally, Jamboard by Google (jamboard.google.com), like the other two digital tools, offers a whiteboard space with the option to add text, freehand doodle, upload images, and use sticky notes. The sticky notes are limited to five color choices and are square only. Users creating Jamboards need to log in with a Google account, but the documents can be shared with others via a unique link and without the need for them to possess or log in to a Google account. Depending on the security setting chosen by the document’s owner, other users can view or edit anonymously. In most cases the instructor will create all the whiteboard spaces for their students; therefore, this software can create more work for instructors when preparing the mapping exercise. However, because Jamboard’s usage provides fewer options (e.g., fewer color choices for the sticky notes and no change of form), I have found it very intuitive to use. In addition, its functionality is very similar to Google Drive documents, with which many instructors and students have experience (since Google Drive documents are commonly used in many K-12 and college-level teaching settings) and, therefore, will not have to learn a new software interface. As with all instruction tools, digital and analog, I recommend that instructors explore these and other options to learn what most suits their and their students’ needs.
Adapting the mapping exercise from a first-year writing course for a course in the majors or graduate students is possible and can combine the benefits of a learning to write and writing to learn activity. The mapping exercise encourages students to move beyond an understanding of individual texts in a mostly isolated and parallel fashion, as is, for example, the focus in annotated bibliography assignments. Mapping can be used to teach students how to write in a specific genre within their discipline, e.g., a literature review in a research article or their thesis or dissertation (learning to write), and also familiarizes them with authors, texts, concepts, definitions, arguments, etc. within their field of study (writing to learn). The mapping exercise can be conducted as described or can be adapted by eliminating the reading and note taking handouts (see Step 1: Note Taking) and/or group exercise and moving students directly into working with their individual research topics and resources. More independent students, for example Ph.D.-level graduate students, can succeed without much initial classroom time to set up the exercise. However, upper-level undergraduate students and new Master’s-level graduate students seem to benefit from time in the classroom, even if it is only 30 minutes, to set up and begin the exercise. Such time allows for answering questions and to help students “get going” on the assignment. It may be tempting to forgo feedback with advanced students while they are working on their maps. However, good feedback benefits students of all levels; it addresses cognitive and motivational factors—informing students how to develop their work and allowing them a feeling of control (Brookhart 2017). Advanced students can provide thoughtful, in-depth feedback on their peers’ maps in a peer-review workshop. These students, like their first-year counterparts, also benefit from one-on-one feedback by the instructor and a presentation of their map to the class for group feedback.
I have also adapted the mapping exercise for students preparing presentations based on their research, in particular for projects in a business writing course where students worked with a local non-profit business on resolving issues the non-profit had encountered. The mapping exercise asked students to visualize the information they had gathered throughout the semester and previously communicated via a written recommendation report. Now, students had to pivot to adapt their communication to a listening audience and its unique needs. Visually organizing their information in a map enabled students to see the hierarchy between topics and their subtopics, supporting evidence, and other information they had compiled. Quite literally seeing the connections provided them with new insights into their project. The strength of the mapping exercise lies in the nature of graphic organizer tools: While the tool remains the same (or very similar) for all levels of students and instructional contexts, the depth of knowledge and the complexity of information represented in the map are determined by the students themselves. In other words, the more advanced the student’s understanding of the subject matter, the more advanced their map will be and vice versa. Using the same tool will not inhibit advanced students from going deeper into their synthesis, and it will not overextend more beginner writers and researchers.
The greatest success of the mapping exercise comes from shifting students away from seeing texts and ideas in isolation and moving them into visualizing the network of connections between ideas and concepts. That happens when students create their own maps and visualize their own organization, rather than simply filling in a provided, empty graphic organizer “shell.” Students often tell me how they experience the topic/argument emerging before their eyes when they, quite literally, see the connections mapped out in front of them. One of the most successful maps I have seen over the years was by a student who visualized a tree structure (and cut a tree from cardboard paper with sticky notes attached all over), including a trunk (the basic, foundational texts), larger main branches (main arguments and evidence), and smaller side branches (supporting arguments and evidence as well as related topics). Their map represented a different kind of metaphor than that of synthesis as a conversation; the student visualized synthesis as a growing and living entity, a tree.
The exercise’s main challenge is to guide students to that moment of insight. Not all students will immediately understand how to connect ideas visually and/or create a (detailed) map. The following two activities help students to get started. First, students can benefit from discussing major concepts, definitions, etc. and from modeling some connections between them. Such discussions can build on the reading and note taking handout (see Supplementary Materials) that students complete during Step 1 of the process. Second, dedicating class time to the beginning and end of the mapping exercise, rather than assigning the entire exercise as homework, assists in getting students started and provides them with time to review and complete their map, respectively. During that in-class time, I make sure to circulate through the class (or breakout groups during virtual classes) for short “check-ins” with the students to address questions and help overcome thinking blocks or misunderstandings. It may take some trial and error for each instructor to understand how much time to dedicate to these check-ins, but I would recommend dedicating about five to ten minutes per individual student or student group as starting point.
Graphic organizers are a powerful learning tool. The Mapping the Conversation exercise moves beyond the use of graphic organizers merely as templates students study and/or complete. Instead, it actively engages students, challenges their critical thinking, and advances their writing skills. The map itself functions as a writing tool and opens the opportunity for discussion and feedback between student and instructor. Mapping is a skill that is advantageous to novice and advanced writers. As indicated, while the exercise was originally developed for a first-year writing class, it can be easily adapted for any setting that requires synthesis writing and therefore benefits students throughout their college career and beyond.
Now that you’ve completed reading all texts and taking notes (see your Reading & Note Taking handout),2 put all the different pieces of information you collected on sticky notes. Capture details, even small ones. Think about using different colors for different texts.
Capture details, even the small ones. Use your physical space—cluster the sticky notes according to the texts.
Map out ideas & Get deeper into your analysis
See if you can find themes, problems, or topics across the different texts. Include context whenever necessary and helpful. Mix and match your sticky notes.
Here are some relationships you might find:
Historical—think about the “before and after” of your topic; how was it a product of its particular historical circumstances
Disciplinary—multiple academic disciplines often study the same phenomenon
Cultural or social—consider national, regional, ethnic, racial, gender, or other kinds of social identities
Start with anything, perhaps a problem or a common theme. Organize the ideas in your clusters. How do clusters and ideas connect? Why do clusters and ideas connect? Move the sticky notes across the whiteboard; use markers, pens, colors, paper to visualize the connections you discover. Write and draw. Play with fonts, arrows, shapes, and sizes, and images. Do whatever helps you visualize the connections you are drawing.
And repeat! Rethink, reorganize, keep asking why.
What topics have you identified? What connections have you discovered? Have you found conflicts? Who agrees with whom and who disagrees? How do the different ideas build on each other? What is missing in the conversation? Think about the authors and their audiences—how does that help you put the texts in perspective? Where can you take your research from here? What other texts do you need to find and read for your own research?
Aitchison, C., and A. Lee. 2006. “Research Writing: Problems and Pedagogies.” Teaching in Higher Education 11 (3): 265–78. https://doi.org/10.1080/13562510600680574.
Badley, G. 2009. “Academic Writing as Shaping and Re-Shaping.” Teaching in Higher Education 14 (2): 209–19. https://doi.org/10.1080/13562510902757294.
Blondy, L. C., A. M. Blakeslee, B. K. Scheffer, M. G. Rubenfeld, B. M. Cronin, and R. Luster-Turner. 2016. “Understanding Synthesis Across Disciplines to Improve Nursing Education.” Western Journal of Nursing Education 38 (6): 668–85. https://doi.org/10.1177/0193945915621720.
Bloom, B. S. 1956. Taxonomy of Educational Objectives: The Classification of Educational Goals. Green: Longmans.
Brookhart, S. M. 2017. “How to Give Effective Feedback to Your Students.”
Burke, K. 1941. The Philosophy of Literary Form. University of California Press.
Condit, C. M. 1992. “Post-Burke: Transcending the Sub-Stance of Dramatism.” Quarterly Journal of Speech 78: 349–55. https://doi.org/10.1080/00335639209384002.
Daher, T. A., and K. A. Kiewra. 2016. “An Investigation of SOAR Study Strategies for Learning from Multiple Online Resources.” Contemporary Educational Psychology 46: 10–21. https://doi.org/10.1016/j.cedpsych.2015.12.004.
Deshler, D., J. Schumaker, J. Bulgren, K. Lenz, J.-E. Jantzen, G. Adams, D. Carnine, B. Grossen, B. Davis, and J. Marquis. 2001. “Making Learning Easier: Connecting New Knowledge to Things Students Already Know.” Teaching Exceptional Children 33 (4): 82–85. https://doi.org/10.1177/004005990103300412.
Du, H., and A. List. 2020. “Researching and Writing Based on Multiple Texts.” Learning and Instruction 66: 1–25. https://doi.org/10.1016/j.learninstruc.2019.101297.
Ellis, E., and P. Howard. 2007. “Graphic Organizers: Power Tools for Teaching Students with Learning Disabilities.” Current Practice Alerts, no. 13: 1–5. http://s3.amazonaws.com/cmi-teaching-ld/alerts/6/uploaded_files/original_alert13.pdf?1301000665=.
Escorcia, D., J.-M. Passerault, C. Ros, and J. Pylouster. 2017. “Profiling Writers: Analysis of Writing Dynamics Among College Students.” Metacognition Learning 12: 233–73. https://doi.org/10.1007/s11409-016-9166-6.
Hall, T., and N. Strangman. 2008. “Graphic Organizers.” National center on accessing the general curriculum at CAST. https://www.northernhighlands.org/cms/lib5/nj01000179/centricity/domain/18/graphic_organizers_2008.pdf.
Kobayashi, K. 2009. “Comprehension of Relations Among Controversial Texts: Effects of External Strategy Use.” Instructional Science 37 (4): 311–24. https://doi.org/10.1007/s11251-007-9041-6.
Lee, C. C., and S. C. Tan. 2010. “Scaffolding Writing Using Feedback in Students’ Graphic OrganizersNovice Writer’s Relevance of Ideas and Cognitive Loads.” Educational Media International 47 (2): 135–52. https://doi.org/10.1080/09523987.2010.492678.
Lillis, T., and J. Turner. 2001. “Student Writing in Higher Education: Contemporary Confusion, Traditional Concerns.” Teaching in Higher Education 6 (1): 57–68. https://doi.org/10.1080/13562510020029608.
Martinez, A. Y. 2014. “A Plea for Critical Race Theory Counterstory: Stock Story Versus Counterstory Dialogues Concerning Alejandra’s ‘Fit’ in the Academy.” Composition Studies 42 (2): 33–55. http://www.jstor.org/stable/43501855.
Pfeiffer, D. 2015. “Dining with Anna Karenina: Opening the Invitation to Burke’s Parlor.” Young Scholars in Writing 12: 83–93. https://youngscholarsinwriting.org/index.php/ysiw/article/view/212.
Tate, A. 1969. “Mr. Burke and the Historical Environment.” In Critical Responses to Kenneth Burke 1924-1966, edited by W. H. Rueckert, 62–70. University of Minnesota Press. (Reprinted from The Southern Review, 2, p. 363, 1936).
Trainor, J. 2013. “Moving Beyond Place in Discussions of Literacy.” Literacy in Composition Studies 1 (1): 45–47. https://licsjournal.org/index.php/LiCS/article/view/815/649.
Critics of Burke have long pointed at limitations of his work, for example, on race (Martinez 2014), gender (Condit 1992), and class (Tate 1969). Some explore issues particularly relevant to the Composition classroom, for example Trainor (2013) on literacy development and Pfeiffer (2015), writing as an undergraduate student, on the power structure inherent in Burke’s parlor that can limit or forbid undergraduate students from joining the conversation.↩︎
Prompt readers, see Supplementary Materials for this handout.↩︎